Outside Keypad Programming
Outside Keypad Programming
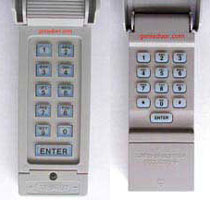
Genie Garage Door Opener Keypads
Genie Garage Door Opener Wireless Keypad Model GPWK-12, GWK
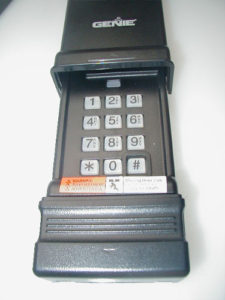
(works with remotes having 9 or 12 internal code setting switches. Keypad is black with a slide-up cover showing the Genie logo only)
This keyless garage door opener entry pad works with Genie transmitters using 390 MHz frequency. It is NOT compatible with Genie Intellicode transmitters (if your keypad has Intellicode printed on the cover, go to the next set of programming instructions below). The Door Code in the Step-By-Step Procedure at right is determined by the internal code switches inside your transmitter and the accompanying chart. Determine the settings of the first 3 switches and write down the corresponding number from the chart. Continue with the next 3 switches and its corresponding number, and so on, until the last set of 3 switches. You should have 3 or 4 Door Code numbers.
| Switch Settings | Door Code Number |
||
|---|---|---|---|
| Up | Up | Up | 7 |
| Up | Up | Down | 6 |
| Up | Down | Up | 5 |
| Up | Down | Down | 4 |
| Down | Up | Up | 3 |
| Down | Up | Down | 2 |
| Down | Down | Up | 1 |
| Down | Down | Down | 0 |
Door Code in Step 4: ___ ___ ___ ___
To make a copy, highlight area and copy into your word program. You can then print out a legible copy of the chart and the programming instructions from your word software.
Step-By-Step Programming Procedure
- Reset Keypad–slide keypad cover half way up. While pressing the # and 8 buttons simultaneously, slide the Keypad Cover the rest of the way up until it latches. Release # and 8 buttons. At this point, if the back lit keypad light stays on, proceed directly to step 2. If the back lit keypad light goes out, close the cover pad and reopen it until it clicks. Proceed to step 2.
- Press 3, 5, 7 and # buttons in said order.
- Enter your PIN and press the # button. Your PIN number can be created from any group of numbers up to 8 digits of your choice. Note: Do NOT use”#” or “star” key.
- Enter Door Code, as determined from the chart above, and press the “star” key.
- Slide Keypad Cover down.
- Test Keypad by sliding cover up until it latches. Enter your PIN and Press “star” key. Your door should operate.
Genie Wireless Intellicode Keyless Entry Pad Programming:
3 Models
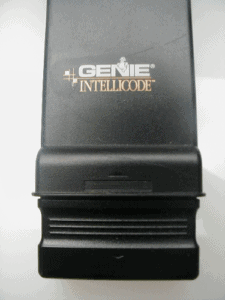
Model 1: Intellicode Model GWKIC, ACSDG (black with slide-up cover and the word “Intellicode” printed on the cover)
GWKIC, ACSDG, Two Part, Step-By-Step Programming
Part 1:
To Reset the Intellicode Wireless Keypad
- Open cover half way.
- Press and hold “PROG” and “8” while fully opening cover. Indicator light will blink once and go out.
- Close cover fully.
To Program the Intellicode Wireless Keypad
- Open cover fully by sliding keypad cover up until it latches.
- Press 3-5-7.
- Press “PROG”. (red light blinks)
- Enter your Personal Identification Number (PIN).
- Press “PROG”. (red light blinks fast)
- Close cover fully.
- Proceed to Part 2 below.
note: if red indicator light does not blink, it is not taking the programming steps. Check the 9 volt battery under the keypad numbers. To access, press inward, under the number pad lip while sliding downward to expose the battery.
Part 2:
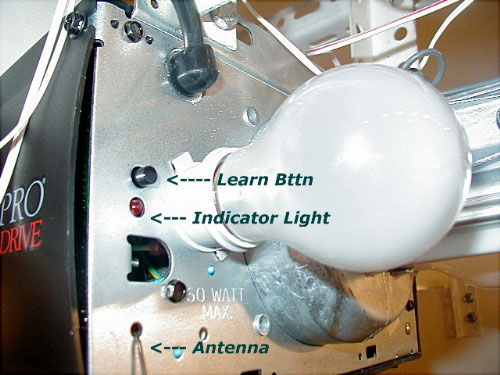
Gently press and release the Receiver Learn Code button on the Power Head Receiver of your Genie Garage Door Opener (Genie motor on the ceiling). This small black button is located behind the light lens at the motor head and is nearest the floppy 6 inch antenna wire that protrudes from the power head. When pressed, a radio signal indicator will start blinking red for 30 seconds.
- Enter your PIN number after pressing the Learn Code button described above, while the motor head indicator light is blinking.
- Press “SEND” 2 times for your system to grab your frequency and code it in.
- Press “SEND” once to test system and start your door moving.
Adding More Doors to Keypad:
- Open cover fully.
- Enter PIN 1.
- Press PROG, PROG, PROG.
- Enter total number of doors (2 or 3)
- Press PROG.
- Follow directions below to set each door.
- Press operator Learn Code Button.
- Enter PIN 1.
- Press SEND
- Enter Door Number (1, 2 or 3)
- Press SEND three times.
- Close Cover.
- Test by Opening Cover, Enter PIN1, Enter 1.
- Go to next machine and follow steps 8 to 13.
With most Genie units, remove the light lens globe to expose the Learn Button on the motor head. The learn button is sometimes located on the back of the unit, or with Excelerator openers, it is under the light lens near the hinge of the lens globe. Always locate the floppy antenna wire first. The Learn Button can be found not far from this antenna. See Troubleshooting Guides for Excelerator photo.
To make a copy, highlight area and copy into your word program. You can then print out a legible copy of the chart and programming steps from your word software.
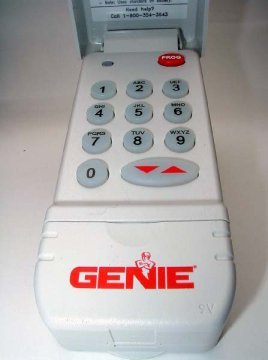
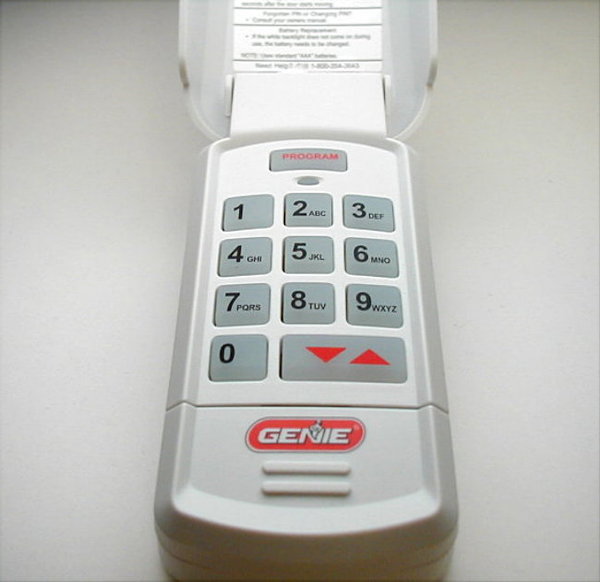
Model 2: Intellicode Model GWKP (off-white with flip-up cover)
Programming Instructions for the GWKP Genie garage door opener keyless entry involves following the two sets of steps below:
- To erase the old PIN (personal identification number) press and hold down, in order, the “PROG,” “6” and “Up/Down Arrow” keys. The red LED will blink once and then turn off. Release the buttons.
- To program: press, in order, but do not hold down the “3,” “5,” “7” and “PROG” keys.
- Enter your chosen PIN, anywhere from 3 to 8 characters.
- Press “PROG” (red LED blinks – twice per second and turns off)
Find the Learn Code Button and the LED indicator light on your Genie motor head inside the garage. It is usually behind the light lens and close to the floppy antenna wire. If your Door Opener does not have an antenna, you have an External Receiver. The External Receiver cover must be removed to access the Learn Code button and the indicator LED. Follow Steps 1 through 3 outlined below:
- Gently press and release the Learn Code button. The red LED indicator light will start to blink. It will blink for up to 30 seconds. While it is blinking, proceed to Step 2:
- Enter your PIN and press the “Up/Down Arrow” key on your keypad. The Learn Code Indicator LED will stay on.
- Press the “Up/Down Arrow” key again. The Learn Code indicator LED turns off. Wait until the Keypad backlight turns off (approximately 30 seconds).
- Test by entering your PIN and pressing the “Up/Down Arrow” key to operate your door.
Multiple Genie Garage Door Opener Programming for GWKP- All garage doors will use the same PIN:
- Enter PIN and press PROG (red LED blinks once per second).
- press PROG again (red LED blinks twice per second).
- press the number of doors you wish to control (2 key or 3 key).
- press PROG (red led blinks several times and turns off).
- Decide which Door will be Door #1, #2, and #3.
- Press the Learn Code Button on the motor head.
- Enter your PIN and press the Up/Down key on the Keypad.
- Press the number you have picked for this Door Opener (key 1, 2 or 3)
- Press the Up/Down key.
- Repeat steps 6 through 9 for each Door Opener.
To make a copy, highlight area and copy into your word program. You can then print out a legible copy of the chart and programming steps from your word software.
Model 3: Programming instructions for the GK-BX Wireless Intellicode Keyad. Works with Genie systems using Intellicode 1 and Intellicode 2 controls.
Intellicode 1 refers to all systems made from 1995 to Present, with the exception of 2011 and 2012. Intellicode 2 refers to most units made in 2011 and 2012.
Programming Intellicode 1:
Note: To clear out factory or previous program settings press and hold both the program key and the Up/Down arrow key until the light flashes twice and goes out.
- In order press keys 3, 5, 7
- Press “Program” key
- Enter your PIN ( from 3 to 8 characters)
- Press “Program” key
- Find the Learn Code Button and the LED indicator light on your Genie motor head inside the garage. It is usually behind the light lens and close to the floppy antenna wire. If your Door Opener does not have an antenna, you have an External Receiver. The External Receiver cover must be removed to access the Learn Code button and the indicator LED.
- Open and enter the PIN, press the Up/Down arrow key and release several times to activate the door.
Once your keypad is programmed, changing your present PIN can be achieved by entering current PIN then press Program, enter your new PIN and press Program. The keypad should now be set to the new PIN.
Programming Intellicode 3 and Intellicode 2
Intellicode 3 (Systems built from 2009 until July 2011)
- Follow steps 1 through 5 above
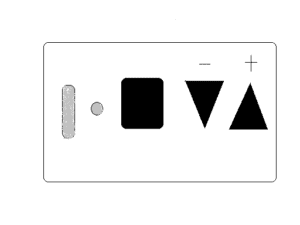
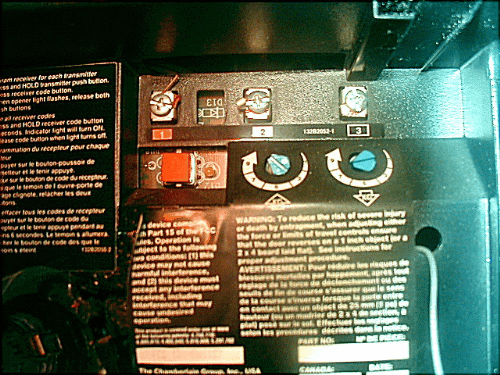
- Press and hold the square PROGRAM button (shown in the diagram above) located on the bottom of the motor head, until both the round and cylinder LEDs turn BLUE.
- Release button. Only the round LED will be BLUE. ( note: if the round, blue LED turns off and the long, purple light starts blinking, go to instructions for Intellicode 2 below )
- Press the square “Program” button and release again. LEDs should blink PURPLE.
- Use an existing remote to unlock the system by pressing it once only.
- On the wireless keypad enter your PIN and press the UP/DOWN arrow key 3, 4 or 5 times until door activates.
- Wait 30 seconds until LED turns off.
- Test by entering PIN and pressing UP/DOWN arrow key once.
Intellicode 2 (Systems built from July 2011 to Present)
- Follow steps 1 through 5 above
- Press and hold the square PROGRAM button (shown in the diagram above) located on the bottom of the motor head, until the round LED turns BLUE and release the button.
- Upon releasing the square button the blue light will turn off and the long purple button will start to blink.
- While the purple light is blinking (30 seconds) go to the the keypad, enter the new code you programmed into the keypad and slowly press and release the UP/DOWN arrow key several times until the door activates.
- Test by entering the PIN and pressing the UP/DOWN arrow key once.
Changing Existing Code (PIN) to a New Code
- Enter existing PIN (personal code) and press the Program Key
- Enter new PIN and press the Program Key
- Wait for the backlight to go out on the keypad
- Test by entering the new PIN and pressing the UP/DOWN arrow key.
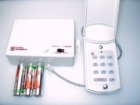
Programming Genie Hardwired Keyless Entry Pads (KEP1) (This keypad has no cover and is connected to the inside receiver by a special ribbon.)
The outside garage door keypad has a flat ribbon, which slides behind the garage door molding into the garage, and attaches to the Keyless Entry Receiver box. Behind the receiver’s cover is a switch.
Slide the switch to SET. Enter your PIN on the outside keypad, followed by the “star” button. Slide the receiver switch back to RUN. Test your PIN code followed by the star button.
Programming DOMINO Hard-Wired Keypads
- Slide switch on box in garage to Program.
- Press ENTER, then put in your own code ( up to 6 digits) and press ENTER again.
- Slide switch on box in garage to OPERATE. Test keypad.
LIFTMASTER AND SEARS CRAFTSMAN WIRELESS KEYPADS
976LM, 977LM, 377LM Security Plus and 66LM Wireless Keyless Entry Systems
- Press and release the “smart” button on garage door opener motor unit. The smart indicator light will glow steadily for 30 seconds.
- Within 30 seconds, enter a four digit personal identification number (PIN) of your choice on the keypad. Then press and hold the ENTER button.
- Release the button when the garage door opener motor unit lights blink. It has learned the code. If light bulbs are not installed, two clicks will be heard.
The square smart button is located on the side or the back of the motor head, and is colored red, green, amber, orange, or purple. It is directly under the #1 wire terminal screw.
PROGRAMMING THE 877MAX KEYLESS ENTRY

- Press and hold the * and # buttons until the lights on the keypad stop blinking.
- Enter a four digit PIN and then press the # button
- Press the Enter button the number of times corresponding with your garage door opener type, shown below
| # of Presses | Garage Door Opener Type |
|---|---|
| 1 | Security + 2.0 (Yellow Learn Button) |
| 2 | 315 MHz Security + (Purple Learn Button) |
| 3 | 390 Security + (Red/Orange Learn Button) |
| 4 | 390 MHz Billion Code (Green Learn Button) |
- To exit programming, press and release the “0” button.
- Press and release the learn button on the garage door opener motor head in the garage.
- Enter the four digit PIN programmed in Step 2 then press the Enter button until the garage door opener lights flash or just hold for 4 seconds and release. Test keypad.
387LM PROGRAMMING INSTRUCTIONS
For Genie or Linear openers with dip switch settings in remotes.
Record the dip switch sequence before performing steps. For every switch in the ON or positive position record a 1, for every switch in the OFF or negative position record a 2. Note: PIN stands for Personal Identification Number of your choice.
Important: after step 1, perform steps 2 through 4 before the keypad back light goes out.
- Press ( * ) and ( # ) keys together until keypad stops flashing.
- Select a 4-digit PIN and enter this PIN followed by the # key.
- Enter ID from chart below and press #
- Enter the DIP switch sequence previously recorded and press #
Back light should turn off after step 4. Test by entering the 4 digit code or PIN and press the zero button for enter or any key other than the # and * keys.
ID DIP Switch System
13 12 DIP switch Genie garage door openers.
14 10 DIP switch Linear garage door openers.
16 10 DIP switch Stanley garage door openers.
17 9 DIP switch Genie garage door openers.
18 8 DIP switch Linear or Moore-O-Matic garage door openers.
Once your keypad is programmed you can change this code in the future. To change your pin enter your PIN and press *, enter a new PIN and press *